Two is Better than One // Zadie Separates

Zadie Separates // Boots and Cats

I am just in the nick of time to share my #FailFebruary garment! Even though in the end I found a creative solution to turn around what was a sad little project, I found it amusing that it went so wrong so many times this month. Maybe I just had to share a fail with y’all, no?

Earlier this month, I was really excited to see the new Zadie dress pattern from Tilly and the Buttons hit the scene. I love the interesting seaming and pleat details. In what can sometimes feel like a sea of basic raglan and shift dress patterns, this dress felt fresh and unique to me. I’ve really been appreciating patterns that give us different and interesting elements or seamlines that let us play. The colour blocking possibilities with this pattern in particular are endless.

So naturally I chose two fabrics that barely contrast each other.

I knew I wanted to make this dress up quickly, to both catch the ‘new release’ wave (since I am often years behind haha) and to give myself a cozy but cute winter dress that my wardrobe really needs right now. I didn’t have any fabric on hand so I went on the hunt and it was SO HARD to narrow down what I wanted! Did I want to play with a print? Contrasting colours? Mixing something neutral with something to stand out? I seriously stared for hours at my million online fabric shopping tabs and the colouring sheet in Photoshop rendering every possible combination. Eventually I narrowed down my fabric to this cozy french terry in two soft colours (oyster and ivory) that would just give a hint of the contrast. After one too many bright dresses that are amazing but I never wear, I figured something more subtle would be nice. Plus, I’ve been loving my Linden in this fabric and knew it would give optimal cuddle factor, and coming from Blackbird I would have it within the week. Sold.

The Zadie pattern itself is a really neat pattern. Instructions are clear, and even the tricky corner seaming of the side panels/waistline/skirt was straightforward. (Though admittedly I DID have to hand stitch the corner closed, both my fear and the squishyness of the fabric made it difficult to run my seams right up to the exact point, but it was an easy enough solution). It sewed up very quickly and I loved all the tips and tricks along the way. Just a note for fabric shoppers, as with all Tilly patterns, they only list one set of fabric requirements, so if you are on the lower end of the size range, you don’t need to buy as much as they suggest (though in my case, having extra on hand turned out to be a huge blessing).

Zadie Separates // Boots and Cats

I was so excited to bring this dress to reality once I got my fabric, but the further along I got in the construction, I started to get fears about my fabric choice. Even though I chose a medium weight knit, as suggested, I kinda took for granted the bit about the stretch recovery. As I added more and more pieces to the dress I realized how heavy it would all end up being. The fact that the waist doesn’t have a full seam meant that the side panels would be taking the weight of the skirt. The french terry had such soft stretch that my fears were realized as soon as I slipped it on… I had one droopy, sad sack of a Zadie. Womp womp.

This was actually so disappointing, and really a fundamental mistake on my end, ignoring how the design of the garment and the fabric would interplay with one another. I didn’t want to start from scratch, mainly because the fabric is soooo comfy and a great quality, I’d hate to see it go to waste (plus, start the agonzing fabric/colour combination hunt all over again? No thank you). It basically came down to two options; take in all the seams in hopes of letting a tighter fit support the weight of the skirt… or give it the chop. In a traditional fit-and-flare pattern with the seam along the natural waistline, this decision might have been easier to make, as the two halves would be leaving a bit more to work with. But the empire line pretty much determined that if I wanted to use the top at all there would need additional fabric to be added on.

After staring at it on the dress form, asking friends for advice, covering each half with my hand with one eye closed to try and envision what might happen for about 3 days I decided just to go for it. I first unpicked the seams attaching the skirt to the bodice, then measured and marked the halfway point to cut through the side panels. Out came the scissors and soon I had a sweater AND a skirt. Yippee!

Zadie Separates // Boots and Cats

To finish the skirt, I dug out an 1.5 cm elastic and measured it around my waist at a comfortable stretch. I then measured the width of the skirt waist to get the circumference of my new waistband and cut it twice the width of my elastic plus seam allowance. I used my overlocker to attach the band on one edge, folded over, and hand-stitched the other edge with an opening to feed the elastic through. There wouldn’t be an easy (or flattering) way to wear the skirt at the original empire waist, but with the a-line silhouette it works perfectly fine at the natural waist.

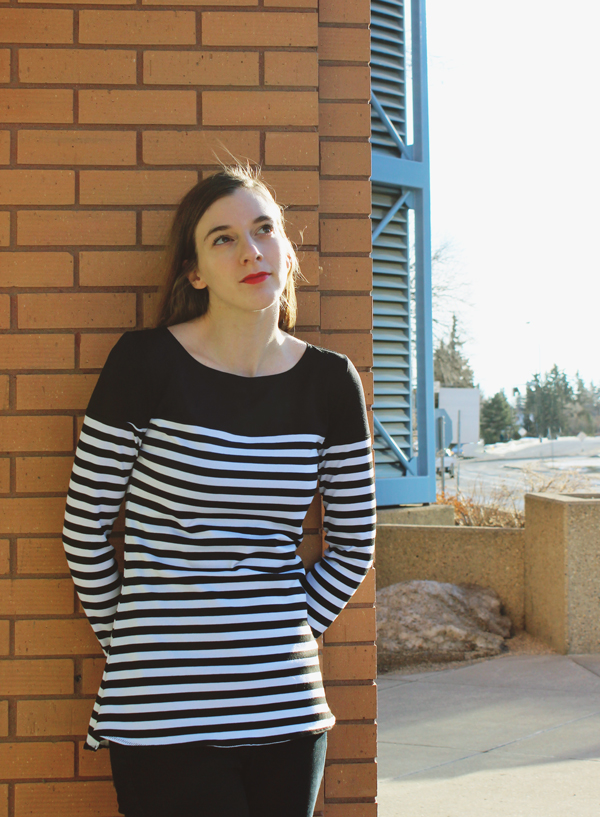
For the sweater, I decided that adding a wide hem band that ended at my natural waist would be the simplest option and would make it a versatile piece to pair with my high-waisted skirt collection. To make the band I measured the hem of the bodice laying flat, then took the length I wanted the band to be (10cm) then doubled it. I cut two rectangular pieces from those measurements. I sewed them together lengthwise, pressed them in half, then attached it with my overlocker to the top (exactly like the hem band on the Linden). The first band I cut I reduced the width to have extra negative ease so it would sit nice and tight. However it was too small for the top which meant that put together the seam was laughably wobbly, wavy and so sad. Plus whenever I moved my arms it would ride up and not slide back down. SO MANY #FAILS.

After sitting in time out for a week, I unpicked the old band, redrafted the hem band without reducing the ease and it worked like a charm. Phew.

Zadie Separates // Boots and Cats

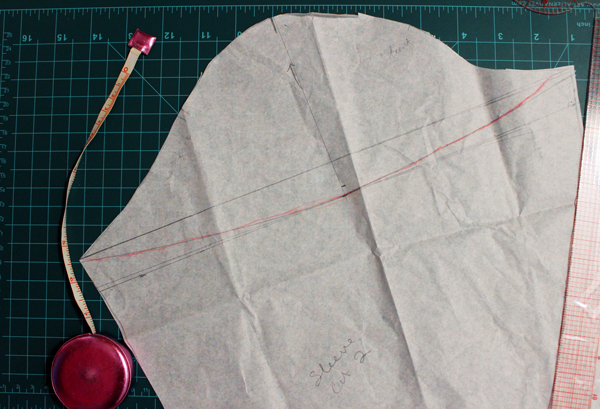
If you want to make this pattern into separates before you sew up the whole thing, just line up the side panel pattern piece along the bodice and mark the seam line. This is where you can cut the side panels, add your seam allowances and repeat for the back pieces. I can make a little tutorial for this if you’d like, since pictures are probably more useful than words. Just let me know 🙂

After all the trials, tribulations and fails, I am actually really stoked about how the cropped sweater turned out! The princess seam details are so unique and unlike anything I currently have, and it will pair so well with my selection of skirts. If I am being completely honest, the skirt was less of a success. The pockets show through the fabric and look kinda lumpy, and the colour doesn’t go with too many of my tops. It is wonderful as a lazy, cuddly, at home skirt, so who knows. I can also wear them both as an ensemble, but I don’t think I will actually do so, especially when mixing and matching can be far more interesting.

Zadie Separates // Boots and Cats

I’ve enjoyed following along with everyone else’s projects they’ve shared that have been less than ideal. It’s always reassuring to know that it’s not always sunshine and roses and sometimes projects don’t work out. We can only hope to reflect, learn and become better seamstresses.

This pattern was gifted to me as part of a request to preview the Zadie pattern. All opinions and sewing gaffes are my own.

Flower Power // Tilly and the Buttons Martha Dress

Swingin' Martha Dress // Boots and Cats

Blooming, bright and frolicky is exactly how you’d describe the light sunny days of May this dress.  That’s right folks, spring (aka dress sewing season) is upon us in full swing and I am thrilled to share another bold 60s-inspired frock to kick it off.

Last month the lovely team at Tilly and the Buttons reached out and asked if I would be interested in previewing a new pattern. Unlike anything I had ever seen before from an indie pattern, the Martha dress is a princess-seamed, bell sleeved, bias-skirted wonder. I instantly fell in love with the high collar and heavy late-sixties vibe. I did not hesitate to accept.

Swingin' Martha Dress // Boots and Cats

This is probably one of the most vintage looking new makes in my wardrobe (though I think Peggy comes close) and not something I’d be likely to find elsewhere, which makes me quite happy. Thankfully my friend let me take photos in her mid-century wonderland of a house to complement it. I could not imagine a more perfect setting to play and swish around in this dress.

I knew immediately I wanted to go all out California-girl with the fabric and went to the store in search of the brightest floral I could find. Luckily this neon polyester crepe had no trouble jumping out at me. I also purchased some matching yellow crochet trim to play with, but I ultimately left it off because this fabric won’t let anything else share the stage. My second design choice was a mint lace with underlay, based off a long lost sold-to-someone-else Etsy find, but I didn’t want to sew multiple layers together for a summer dress. Perhaps in version 2.0?

Swingin' Martha Dress // Boots and Cats

I also toyed with the idea of making a sleeveless version, which would probably be more comfortable on hot days, as well as more practical for cool-weather layering. After much debate (and Instagram feedback) I decided to leave them on. I really need to accept that I need more sleeves in my life. The bell sleeves also cement the vintage vibe. A sleeveless version probably would have a skater dress feel, which really opens this pattern to different styling opportunities.

If you are on a fabric budget, or have a great textile in your stash, I will say that the fabric requirements are quite generous and you can do a lot with less. The envelope suggests over 3m of fabric (to accommodate the bias cut skirt pieces, and long skirt version), but since I made the mini skirt in one of the smaller sizes, I was able to arrange and cut my pieces and was left with a solid meter of fabric leftover.

Swingin' Martha Dress // Boots and Cats

Because of the crepe texture of the fabric, it was great to sew with, sort of ‘sticking’ to itself and keeping still. However in cutting out the pieces, this was one of the few times having a cutting table would have been ideal. I do all my fabric cutting on the floor of my living room and while it works for thicker, stable fabrics, the soft flowy nature of this was not having it. I used my rotary cutter and 3 small cutting mats strategically placed underneath piece by piece to get the job done.

This haphazard cutting method left me with a few errors in my pieces. Things shifted and slid, as they do. For example,  when I went to attach the skirt to the bodice it was far too long! I could have gathered the skirt to make it fit but it would have totally ruined the dress’ silhouette. After some frustrated pondering, I opted to let out the side and princess seams to a 0.5 cm seam allowance to get them to fit (perfectly with aligned seams, I might add).

Swingin' Martha Dress // Boots and Cats

I am not a fan of facings on the best of days and for this project in particular I felt it was a bit superfluous. Because my fabric was so light and flowy, it added visible bulk to my neckline, so I removed it (with the exception of a small triangle bit to keep the zipper faced), and simply overlocked the collar piece to the bodice. I’ve said before that the beauty of the insides of my garments isn’t my #1 priority so this was an easy decision to make. I’m sure with a sturdier fabric the facing would add a nice finish and support the collar well.

The small tip of using a hair elastic for the button loop closure was one of those mind-blowing sewing hacks that make life so easy and make you say ‘now, why didn’t I think of that?!”. I felt a little guilty at first, cutting into a perfectly good hair tie, but since only a small portion (~5cm) is needed, I saved the remainder for future loops. It has lots of stretch and looks so good. Total win.

Swingin' Martha Dress // Boots and Cats

Size wise I cut a straight size 2 from Tilly’s size chart. It is a pretty spot on fit, though I could have graded out a little at the waist I think (my measurements sit between size 2-3) to allow extra room for pizza parties. Since the pattern has a natural waist seam I added my traditional 4 cm bodice lengthening (which as I now type this, I think also had probably something to do with my bodice/skirt alignment issues…)

What I really enjoyed about making this dress was the inclusion of new techniques that aren’t difficult, but things I simply hadn’t encountered before in a pattern. The bias cut skirt pieces and the high collar were new things to play with and learn from, without feeling scary or unattainable.

Swingin' Martha Dress // Boots and Cats

I am looking forward to picnics and patio parties and all other excuses to wear bright summery frocks. Not to mention even more summery frocks to sew sew sew. Ahhh I love this time of year.

This pattern was gifted to me as part of a request to preview the new Martha pattern. All opinions and sewing gaffes are my own.

A Taste of the 60s // Striped Coco Dress

Tilly and the Buttons Coco Dress // Boots and Cats

I’ve got another really fun one to share with you today. For the second look capturing the fun and bright spirit of the 60s, how could I deny you the most perfect retro-made-modern dress that is the Tilly and the Buttons Coco?

I realized that I don’t really have much to say about this dress, yet it’s one of my favourite makes to date. It’s funny how that works out that way. When I initially got this striped fabric, I knew right away this was exactly what it was going to be. A striped Coco has been on my sew-do list since I first laid eyes on the pattern. I talked about my finding-a-good-striped-fabric woes in the post about my Coco Breton top last month, but if you got any good stripe sources, hook me up!

Both striped Coco projects were actually cut out at the same time. I cut out the dress, then noticed I had enough left to make the breton top too. Probably because it was still pants weather at that point, the top got made first.

On that note about pattern cutting, I have to ask, what’s your process with sewing projects? Do you work on a single garment, start to finish before starting something new, or do you have multiple things on the go? I used to be strictly one-at-a-time, but I found I ended up sewing less frequently because of it.

Cutting out pattern pieces is definitely my least favourite part of the process (it doesn’t help that I don’t have room for a table and I work off the floor) so it takes a lot of inertia to get started on a project, especially if I am short on time. I have started to cut out a few projects in bulk when I have lots of energy, so I have at least one or two projects ready to go when sewing time is scarcer. I do have to be careful not to prepare TOO many projects or else they stare me down and make me feel guilty they aren’t done yet, but so far this is working pretty well. I’d love to hear how you work around your projects and prep things to sew. I’m all about streamlining.

Anywho, back to Coco.

I was trying to think about why this dress just worked for me. It was hard to narrow it down to describe. It’s this perfect blend of simple yet bold, classic yet unique, different but everyday wearable. It’s everything all in one, and it just ‘clicks’.

This makes my third Coco overall. I said it before, but I think this pattern will be my ultimate TNT. I remember when I first started thinking about what I truly wanted from my clothes, I was often pinning styles that had the 60s funnel neck collar, without pinpointing that was a design element I loved. Once I discovered Tilly, it totally made sense to me, and it was one of the first indie patterns I bought. Unfortunately my first top was made of a poor quality fabric and hasn’t worn super well over time.

Construction notes are super basic: Straight cut in size 2 with usual waist length added. I wanted to play with the graphic nature of the stripe so I opted for the option with contrast cuffs. I thought of adding in the pockets too, but it was much too busy. It was all sewed with the overlocker except for the hem.  Easy peasy lemon squeezy.

Tilly and the Buttons Coco Dress // Boots and Cats

The thick ponte makes this dress the perfect transitional piece for this strange winter-spring (winting?) hybrid season we are currently having. It’s soft and snuggly with a print that says bring on the sunshine. I also want to make more Coco tops in a selection of basic solid colours (though my stash is currently lacking in the solid color department…) to wear year-round so keep your eyes out for more retro goodness.

One more look coming from this photo session with Breanne Marie Photography comin’ atcha next week.

Stripes & Solids // A Colour-Blocked Coco Top

Colour Blocking your Coco Top // Boots and Cats

If you asked me to describe my style I would probably tell you something along the lines of: classic, kinda preppy, with a vintage twist. I have a tendency to make some very loud statement pieces that step outside of that description, but on the daily I tend to feel most comfortable and confident in neutral colours and classic cuts. You’ll find me often in skinny jeans and cardigan, or if I’m feeling fancy, a high-waisted skirt and a comfy sweater.

But for the longest time a crucial staple in the classic-preppy-vintage style profile was glaringly missing from my wardrobe selection: a Breton top. (Or as most people know it, a striped shirt, or sailor shirt. Tilly rounded up a wonderful history of it here)

I’ve always loved the ease and style that was exuded from a Breton. So effortless, so chic. This admiration, of course, made me unwittingly picky about what it should be. Not too sheer or draped, has to have the classic wide neckline, long sleeves, preferably colour blocked, with smaller, unbalanced stripes.

How could any shirt possibly meet those standards? Turns out, they couldn’t. It seemed the more I looked for the perfect shirt, the more elusive it became.

Colour Blocking your Coco Top // Boots and Cats

So I turned to the wise muse that is Dr. Seuss in one of his all-time classics.

Did that stop the old Grinch? No! The Grinch simply said,

“If I can’t find a Breton top, I’ll make one instead!”


(That’s totally how it goes.)

Though, as you sewing folk will know, simply deciding to make the perfect Breton top isn’t as easy as waltzing in to the nearest Fabricland to get started. Finding a halfway decent striped knit can be like searching for a needle in a haystack. Even when I did manage to find a fabric that was soft, had good stretch recovery and weight…it was always in the weirdest colour. You’d think black and white would be far more in demand.

Thankfully, this Christmas I received the most wonderful gift. I opened the box and inside was a beautiful black and white striped ponte knit from Girl Charlee. The heavens opened, angels sang, and many projects were planned.

I unquestionably chose Tilly & The Buttons Coco for the pattern because it perfectly encapsulates the vintage and modern vibes I love. (I plan on making many 60s funnel neck versions soon too! I think I can safely say this is one of my first TNT patterns)

Colour Blocking your Coco Top // Boots and Cats

I wanted to soften the look of the stripes for this top and opted to colour block the shoulders. Ideally it would have been in white, but the ponte I had was a slightly cream colour and didn’t match. Luckily, black goes with everything.

I looked into some colour blocking pattern hacks in bloggerland and it seemed like a pretty simple adjustment. The Grainline Lark tutorial was the easiest way I found to line up your blocked seams. I did start to notice, however, that the shoulder curves on the Coco sleeves were quite shallow. I feared this would mean that if I blocked my pattern straight across from the armpit seam it wouldn’t cut straight across my body as I wore it. I didn’t want to lower the blocking either (it would look strange if it cut across the bust), so I would need to do some crafty drafting.

Colour Blocking your Coco Top // Boots and Cats

Using a highly professional (made-up) method, I had to determine the shape of the sleeve cap so it would appear straight as I wore it. I put on my first Coco I made and took an elastic band and wrapped it on my arm. I moved it up until it was touching the underarm seam and arranged it to look straight. I then got Rory to take a measurement of the elastic to the shoulder seam. This distance was about 12 cm. (If I cut straight across the pattern piece, this distance was closer to 10cm, meaning it definitely would have angled upwards when I wore it).

To make my pattern pieces, I traced the sleeve onto some paper and measured 12 cm (+the seam allowance) down from the center of the sleeve. Using a dressmaker’s curve, I met the center line with the underarm seam points, so it would match my blocking point on the bodice. I then cut along this curve, added seam allowances, and had my new pattern pieces!

Colour Blocking your Coco Top // Boots and Cats

It was stressful cutting out the pattern pieces, not knowing if this would actually work or not (yet not stressful enough to make a muslin it seems…). The stress must have impeded my attention to cutting detail and I totally miss-cut one of my sleeves (it was the bottom layer and I didn’t notice I hadn’t enough fabric in that spot). I hate that feeling of wasting fabric on silly mistakes.

Then for some strange reason after I re-cut my second sleeve and compared it to the first, even though they start on the same stripe and measure to the same length…they end on different stripes? I tried to even it out when hemming but I didn’t want to make one sleeve much longer than the other. Can’t really explain how that was accomplished…but hey I bet you didn’t even notice.

I cut a straight size 2, but added my usual 6cm length to the bodice and sleeves, and took down the flare of the pattern a bit at the hips.

Colour Blocking your Coco Top // Boots and Cats

The sewing was a breeze, as this wasn’t my first Coco rodeo. Tilly’s instructions are beautiful and simple with helpful tips thrown in. I just love this pattern so much.

And wouldn’t ya know, my pattern hacking totally worked out! It can be harder to see in the photos because the stripes and fabric movement, but the line of the colour blocking is DARN NEAR PERFECT! Aha. Victory. Pattern drafting and I have a nice streak going.

I am so pleased to welcome this classic staple into my wardrobe FINALLY. The ponte is soft, stretchy and quite thick, making it a wonderful winter top. Come summer though, I might want to make a lighter weight version.

I guess the search for stripes continues.

Me-Made-May // Week 3

Me Made May Week 3 // Boots & Cats

Another week, another handful of me-mades. This week has definitely been more of a struggle than the rest. I made the discovery that most of my makes are for mild weather, and this week’s heat wave made things a little challenging (not that I am complaining about it! ). I dipped into some repeats but tried to keep creative in how I styled and documented them so I didn’t feel like I was being lazy about it.

Here’s a glimpse into my week:

Day 15: 70s peasant dress

Me Made May Day 15 // Boots & Cats

This week’s Friday challenge was ‘something old’, so I dug out one of the first garments I ever made. My grandma was teaching me to sew the summer before the 7th grade and I picked out this 70s pattern from her stash to make. I love the styling and illustrations on the envelope and I imagined I would be as trendy as them. I told myself I would wear this for the first day of junior high. Well…sizing proportions and fabric choice made this dress far less appealing than on the envelope and this dress was relegated to the ‘costume’ drawer for years. Well I decided to give it a go and guess what? It fits now! Ha.

Day 16: Hand-stitched hair bow

Me Made May Day 16 // Boots & Cats

Today was apartment cleaning day, so instead of running the risk of ruining any me-mades in the throes of it all, this little hair bow was just the ticket.

Day 17: Comfy and casual Plantain tee

Me Made May Day 17 // Boots & Cats

A day at the park with warm sunshine and a cool breeze was perfect for my stripey tee.

Day 18: Self-drafted ‘paper bag’ skirt

Me Made May Day 18 // Boots & Cats

Another A Beautiful Mess DIY dress-up project, I made this a few summers ago, and ran with the paper bag concept by using this burgundy burlap type fabric. It’s surprisingly comfortable and was so easy to make. I walked to the market on this holiday Monday to get some bedding plants to set my garden.

Day 19: Tilly and the Buttons Coco top

Me Made May Day 19 // Boots & Cats

My first repeat (I made it 19 days!), I paired this top with these crazy pants I had custom made for me last summer by Todoruk Designs. I love these pants so much. Retro meets modern. I made the coco with these pants in mind, actually. A 60s loungewear dream.

Day 20: Vintage fabric Belcarra blouse

Me Made May Day 20 // Boots & Cats

It was getting far to warm for any of my other makes, and this lightweight Belcarra is a summer fave, so another repeat but styled with jeans instead of a skirt. This pattern is so versatile, and I am almost finished making my third!

Day 21: Belcarra version two!

Me Made May Day 21 // Boots & Cats

It was a swingy skirt day for sure, and my grey Belcarra blouse paired perfectly with this bicycle Heart of Haute skirt. Blissful.